Tapestry Crochet for Beginners

In this beginner’s guide, I’ll show you just how easy tapestry crochet can be. We’ll go over what tapestry crochet is, how to read tapestry crochet charts, and tips for completing your first tapestry crochet project.
Think tapestry crochet is too tricky with all those color changes? I felt the same way when I first came across it. But let me tell you a secret – It’s not as hard as it looks!
Tapestry crochet is just about as easy as regular single crochet – the basic steps and hand motions are the same. The difference? In tapestry crochet, you’ll carry two or more strands of yarn at the same time, and alternate between the colors as you work across the row.
What is Tapestry Crochet?
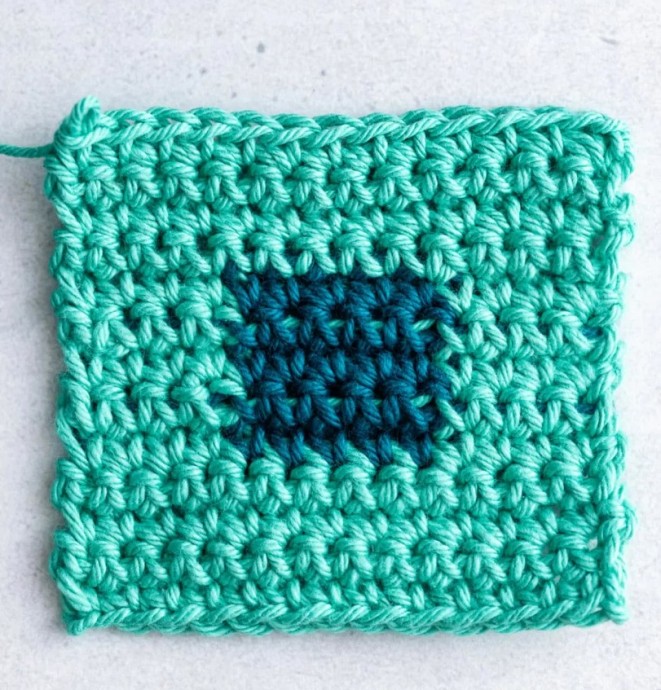
Tapestry crochet is a colorwork technique where you use two or more yarn colors in the same row (or round) to create colorful designs. You’ll hold both strands of yarn at the same time, and crochet over the non-working strand while changing colors according to the chart or written pattern.
Tapestry crochet differs from other colorwork methods like fair isle crochet – where you leave “floats” of unused yarn at the back – and instarsia crochet – where you use a separate length of yarn for each color section.
Instead, in tapestry crochet, you carry the non-working yarn with you, crocheting over it and encasing it inside the stitches as you go along. The result is a tidy, two-sided fabric with the design on both sides (with no messy floats or countless ends to weave in!)
Supplies You’ll Need
One of the great things about tapestry crochet is you don’t need any specialized tools beyond your usual crochet hooks and yarn. Here’s a quick list of supplies to have on hand:
Yarn: Tapestry crochet works best with smooth yarns that will show off the colorwork. I recommend worsted-weight cotton, wool, or acrylic blend yarns. Choose something sturdy that won’t split, and isn’t too fuzzy. And of course, you’ll need at least two contrasting colors.
Crochet Hooks: Tapestry crochet looks best when the stitches are a little tighter than usual (since you’re trying to hide the non-working yarn inside the stitches.) To make tighter stitches, choose a crochet hook that is one to two sizes smaller than recommended on the yarn label. I recommend making a small test swatch to find the right hook size before starting on your main project.
Stitch Markers: Stitch markers will help you keep track of the start or end of a round, or mark important stitches in your pattern.
Yarn Needle: Choose a blunt-tipped needle with a large eye to weave in your yarn ends.
Basic Tapestry Crochet Techniques
Alright, now that you’ve got your supplies together, it’s time to start crocheting. In this section, we’ll go over the basic techniques you’ll need for tapestry crochet.
- Crocheting over the non-working yarn
- Changing colors in tapestry crochet
- Reading tapestry crochet charts
How to Crochet Over the Non-Working Yarn
As explained earlier, a key feature of tapestry crochet is that you’ll hold two strands of yarn simultaneously – the working color and the non-working color – as you work across the row.
And unlike other colorwork techniques, you don’t cut the yarn every time you switch colors. Instead, you continuously carry both strands, crocheting over the non-working yarn as you make new stitches.
To crochet over the non-working yarn:
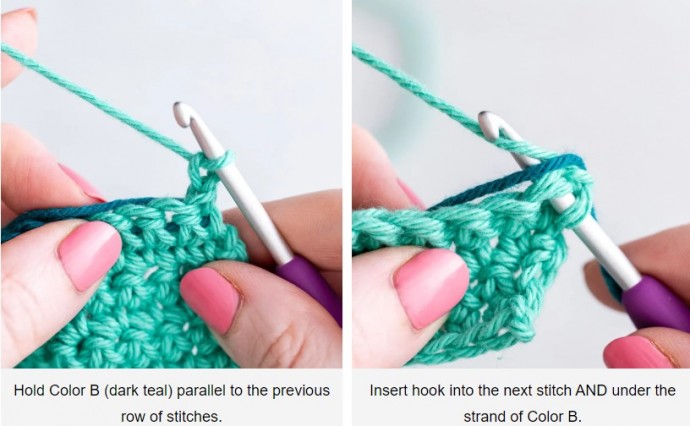
Hold Color B (or the non-working yarn) parallel to the previous row of stitches. Insert your hook into the next stitch AND under the stand of Color B, and work the stitch as normal.
Tip: When the RS (right side) of the work is facing you, hold the non-working yarn slightly to the back of the previous row of stitches. When the WS (wrong side) of the work is facing you, hold the nonworking yarn slightly to the front of the previous row of stitches. Working this way will keep the right side of your work as smooth and neat as possible.
How to Change Color in Tapestry Crochet
Now that you know how to hold two or more colors in a single row or round, it’s time to learn how to change colors in tapestry crochet. (The good news is that it’s just the same as changing colors in regular crochet!)
Here’s how to change colors:
Work the last stitch of Color A, but stop right before the final yarn over. Pick up Color B, do the last yarn over with color B, and pull through the loops on the hook to finish the stitch.
Then, hold Color A parallel to the previous row of stitches. Work stitches with Color B by inserting the hook into the next stitch AND under the strand of Color A.
When it’s time to switch back to Color A, you’ll work another color change.
To switch back to color A: Work the last stitch of Color B, and stop right before the last yarn over. Then, do the last yarn over with color A, and pull through the loops on the hook to finish the stitch.
Working in the Round vs. Working in Rows
Tapestry crochet can be worked in two ways – in the round or flat. Both methods create beautiful patterns, but the process varies slightly.
When working in the round, you’ll be creating a tube of fabric. You’ll always be working from the right side of the fabric, so you don’t need to worry about right and wrong sides.
When working flat, you’re creating a rectangular or square piece of fabric. You’ll turn your work at the end of each row, alternating between the right side and the wrong side.
Turning Your Work: Right Side vs. Wrong Side
When turning your work, it’s best to keep the non-working yarn to the back of your work to keep things tidy.
- When turning to start a new row on the WS, pass the non-working yarn to the front of the work.
- When turning to start a new row on the RS, pass the non-working yarn to the back of the work.
How to Read Tapestry Crochet Charts
Great, we’re moving right along! Now that you know the technique for crocheting over the non-working yarn and changing colors, it’s time to talk about reading tapestry crochet patterns.
Tapestry crochet patterns will commonly include both a chart and written instructions detailing the colorwork design. I like working from charts, because they allow you to visualize the full motif or picture you’ll be creating.
Here’s how to read them:
The charts used for tapestry crochet are gridded designs, with each square representing a stitch. Each square contains a symbol or color that indicates which yarn color to use for that stitch. (If the chart uses symbols, it will also include a key that explains what yarn color each symbol represents.)
Charts can seem intimidating at first. But with a bit of practice, you’ll likely prefer them to written patterns.
Where to Start Reading
Perhaps the trickiest part of working with crochet colorwork charts is knowing where to start, and in which direction to read. Here’s the answer:
If you are working in rows: Start the first row at the bottom right corner, and work your way from right to left. Then, move up to the second row, and work your way back from left to right. Continue in this way, working odd-numbered rows from right to left, and even-numbered rows from left to right.
If you are working in rounds, you will always read the pattern from right to left.
As you crochet each row or round, refer to the chart to know which color to use for each stitch.
Left-handed? If you are left-handed, you’ll likely read tapestry crochet color charts in the opposite direction. Read your RS rows from left to right, and your WS rows from right to left. And if you’re working in rounds, you’ll read each round from left to right.
Tip: Place a ruler or highlighter under the chart row you’re working to keep your place. Take it slow at first, carefully counting stitches and double-checking your colors. With a little practice, reading tapestry charts will feel more natural.
Which Stitches to Use for Tapestry Crochet
At this point, you may be wondering which stitches are best to use for tapestry crochet. Single crochet and its variations are by far the most common – but they’re not the only options. Some patterns may call for waistcoat stitch, double crochet, or other stitches to create different fabric textures.
Whichever stitch your pattern calls for, the basic tapestry techniques remain the same – carrying and crocheting over the unused yarn color as you go. In the section below, we’ll go over the stitches that you might use for tapestry crochet.
Single Crochet (sc): This is one of the most popular stitches used for tapestry crochet. Single crochet creates a nice tight, dense fabric that shows off colorwork well.
To make a single crochet: Insert your hook into the next stitch, yo, pull up a loop, yo again, and pull through both loops on the hook.
One thing to keep in mind is that single crochet stitches aren’t perfectly symmetrical – they have a slight “lean” to them. This slant may not be noticeable in back-and-forth rows. But when working continuously in rounds, the “lean” causes stitches to gradually drift out of alignment. Over time, this can create a noticeable slant in your colorwork pattern.
To counteract this slant, consider using modified single crochet techniques like the ones below.
Single Crochet Back Loop Only (sc-blo): Working single crochet in the back loops only can counteract their tendency to slant, and help the color changes align better. Working sc-blo is especially helpful when crocheting in the round. One thing to note is that the sc-blo stitch does introduce a slight horizontal line texture to the finished fabric.
To make a sc-blo: insert the hook through the back loop only of the stitch, and work a single crochet as normal.
Modified Single Crochet (msc): Here’s another variation on the single crochet. To make a modified single crochet, make two changes to a regular single crochet. First, work only in the back loops. Then, instead of yarning over and pulling the yarn through both loops to finish the stitch, you’ll yarn under and pull through both loops.
Waistcoat Stitch (Center Single Crochet): This knit-look stitch creates a very dense fabric – so you might consider working with a slightly larger hook.
Taller stitches, such as a half double or double crochet, can also be used for tapestry crochet. Keep in mind that the taller the stitch, the more “stretched out” the pattern will look.


