Cute Bunny Crochet Square Photo Tutorial

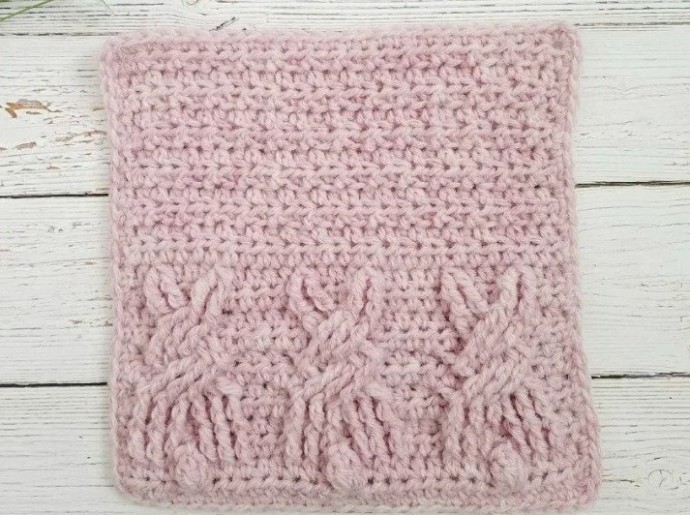
These cute little cabled bunnies were inspired by a knit pattern I found on Pinterest.
Immediately when I saw it I thought, hey I wonder if I could crochet that. It took a little trial and error to get it just right but it all finally worked out.
These little squares would be great for a baby blanket, an Easter project or anything else you can think of!
Learn how to crochet the Cute Bunny Square with this photo tutorial.
Materials
- Lion Brand Wool-Ease 3oz/197yds, 80% Acrylic/20% wool or similar #4 worsted weight yarn
- 5mm/H Crochet Hook
- Needle to weave in ends
- Scissors
Gauge and Sizing
- Gauge: 7 sts x 6 rows in hdc
- Finished Square: 8.5 x 8.5 inches
Abbreviations
- Ch(s): chain(s)
- Hdc: half double crochet
- St(s): stitch(es)
- Pc: popcorn
- Fptr: front post treble crochet
- Fpdtr: front post double treble crochet
- Fpdtr2tog: Front post double treble crochet 2 stitches together
- BLO: back loop only
- FLO: front loop only
Special Stitches
- Popcorn (pc): Work 5 dc in stitch indicated. After last dc remove hook and insert through both loops of 1st dc, grab loop of last dc and pull through.
- Front Post Treble Crochet (fptr): Yo (yarnover) x2, insert around stitch indicated from front to back to front, (yo, pull through 2 loops) 3 times.
- Front post double treble crochet (Fpdtr): Yo 3 times, insert hook around stitch indicated from front to back to front, (yo pull through 2 loops) 4 times.
- Front post double treble 2 together (Fpdtr2tog): Yo 3 times, insert hook around stitch indicated from front to back to front, (yo pull through 2 loops) 3 times. 2 loops left on hook. Yo 3 times, insert hook around next indicated stitch from front to back to front, (yo pull through 2 loops) 3 times. 3 loops left on hook. Yo pull through all loops.
Notes
- Ch 1 does not count as a stitch
- Keep your tension loose and even when working the post stitches
- All post stitches are worked around the sts 2 rows below
- Each row will have 27 stitches.
Sizing options
- If you would like to work this square pattern in rows chain a multiple of 9 + 1. And repeat all the rows.
- If you would like to work only the cable bunny portion in rows chain a multiple of 9 +1 and repeat row 1-13.
- If you choose to do either of these things take now where it says “repeat from * x amount of times” may have to be modified to accommodate your row length.
Instructions
Ch 28 to start
Row 1: Hdc in 2nd ch from hook and in each ch across, turn (27)
Row 2: Ch 1, hdc in same st as ch 1 and in next 3 sts, Pc in next, *hdc 8, pc in next repeat from * 1 more time. Hdc in last 4 sts. Turn
Row 3: Ch 1, hdc in 2nd st from hook and in each st across, turn
Row 4: Ch 1, hdc in same st as ch 1. * Fptr around next 3 sts 2 rows below (row 2). Hdc in next, Fptr around next 3 sts 2 rows below, hdc in next 2. Repeat from * 1 more time. Fptr around next 3 sts 2 rows below. Hdc in next, Fptr around next 3 sts 2 rows below, hdc in last. Turn
Row 5: Ch 1, hdc in same st as ch 1 and in each st across. turn.
Row 6: Ch 1, hdc in same st as ch 1. *Fptr around next 3 fptc’s from row 4, hdc in next, Fptr around next 3 fptc from row 4, hdc in next 2. Repeat from * 1 more time. Fptr around next 3 fptc from row 4. Hdc in next, Fptr around next 3 fptc from row 4, hdc in last. Turn
Row 7: Ch 1, hdc in same st as ch 1 and in each st across. Turn.
Row 8: Ch 1, Hdc in same st as ch 1, *Skip 4 sts, Fpdtr around next 3 fptc’s from row 6, Hdc in last skipped st. Working behind the Fpdtr sts you just made, Fpdtr around the 3 skipped fptc’s from row 6. Hdc in next 2 sts. Repeat from * 1 more time. Skip 4 sts, Fpdtr around next 3 fptc’s from row 6, Hdc in last skipped st. Working behind the Fpdtr sts you just made, Fpdtr around the 3 skipped fptc’s from row 6. Hdc in last. Turn.
Row 9: Ch 1, hdc in same st as ch2 and in each st across. Turn.
Row 10: Ch 1, hdc in same st as ch 1 and in next. *Skip 3 sts. Fpdtr around next fpdtr from row 8, Fpdtr2tog over next 2 fpdtr. Hdc in last skipped st. Working behind the fpdtr and fpdtr2tog you just made, Fpdtr around 1st skipped fpdtr from row 8, Fpdtr2tog over next 2 fpdtr. Hdc in next 4 sts. Repeat from * 1 more time. Skip 3 sts. Fpdtr around next fpdtr from row 8, Fpdtr2tog over next 2 fpdtr. Hdc in last skipped st. Working behind the fpdtr and fpdtr2tog you just made, Fpdtr around 1st skipped fpdtr from row 8, Fpdtr2tog over next 2 fpdtr. Hdc in last 2 sts. Turn
Row 11: Ch 1, hdc in same st as ch 1 and in each st across. Turn.
Row 12: Ch 1, hdc in same st as ch 1 and in next st. *Fpdtr2tog over next Fpdtr and fpdtr2tog from row 10, hdc in next 3 sts. Fpdtr2tog over next fpdtr2tog and fpdtr. Hdc in next 4. Repeat from * 1 more time. Fpdtr2tog over next Fpdtr and fpdtr2tog from row 10, hdc in next 3 sts. Fpdtr2tog over next fpdtr2tog and fpdtr. Hdc in last 2 sts. Turn.
Row 13: Ch 1, hdc in same st as ch 1 and in each st across. Turn.
Row 14-23: Ch 1, hdc in same st as chain 1. *Working in BLO, hdc in next. Working in FLO, hdc in next. Repeat from * across until 1 st remains. Hdc in last st. Turn.
Turn after last row, Ch 1, sc in same st as ch 1 and evenly around, placing 3 sc in each corner. End with 2 sc in same st as ch 1. Join with sl st. Weave in ends.


