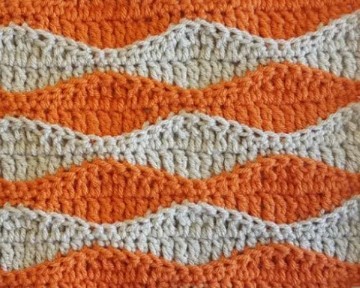
Textured Rolling Waves Crochet Pattern Photo Tutorial

The Textured Rolling Waves Pattern is a beginner-friendly crochet pattern, using only basic stitches.
It is double-sided, meaning it looks good on both sides which makes it perfect for a large variety of projects.
I combined the classic rolling waves pattern with working in the back loop only technique to create a pattern with a beautiful texture on one side and flat on the other side.
Learn how to crochet the Textured Rolling Waves Stitch with this photo tutorial.
Materials
- Stylecraft Special Chunky in parchment and spice
- 4.5mm crochet hook
Abbreviations
- tr – treble
- ch – chain
- yo- yarn over
- dc – double crochet
- long sc – long single crochet
- sc – single crochet
- sk – skip
- hdc – half double crochet
Special Stitches
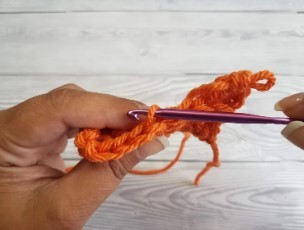
Crocheting In The Back Loop Only (blo) – A stitch has a front and back loop that meet at one end and look like a horizontal V.
To crochet a stitch in the back loop only, yo (once for hdc and dc, twice for a tr, don’t yo if you want to make a sc), insert the hook in the middle of the V from the top, and under the back loop (the loop that is away from you), yo and draw up a loop (you will have 2 loops on the hook for a sc, or 3 loops on the hook for a hdc and dc, or 4 loops on the hook for a tr).
From this point on, continue to crochet the stitch you wanted as usual.
Notes:
- If you don’t want a border around your work, then cut the yarn at each color change and weave in the ends as usual.
- ch4 at the beginning of the row counts as a treble
- the Final Row is crocheted to give the blanket a flat edge
Instructions:
Start with the orange yarn and chain 46 or any (multiples of 14)+4 chains.
Row 1: continue with orange, sc in 2nd ch from hook, sc in next 2sts, *2hdc, 2dc, 3tr, 2dc, 2hdc, 3sc*, repeat ** until the end of the row, turn
Row 2: change colors to beige, (sc blo in the very first stitch, ch3) – this counts as your first treble, 2tr blo, *2dc blo, 2hdc blo, 3sc blo, 2hdc blo, 2dc blo, 3tr blo*, repeat ** until the end of the row, turn
Row 3: continue with beige color, ch4, 2tr, *2dc, 2hdc, 3sc, 2hdc, 2dc, 3tr* , repeat ** until the end of the row, ch1, turn
Row 4: change colors to orange, sc blo in the very first stitch, 2sc blo, *2hdc blo, 2dc blo, 3tr blo, 2dc blo, 2hdc blo, 3sc blo*, repeat ** until the end of the row, ch1, turn
Row 5: continue with orange, sc in the very first stitch, 2sc, *2hdc, 2dc, 3tr, 2dc, 2hdc, 3sc*, repeat ** until the end of the row, turn
Row 6: change colors to beige, (sc blo in the very first stitch, ch3) – this counts as your first treble, 2tr blo, *2dc blo, 2hdc blo, 3sc blo, 2hdc blo, 2dc blo, 3tr blo*, repeat ** until the end of the row, turn
Row 7: continue with beige color, ch4, 2tr, *2dc, 2hdc, 3sc, 2hdc, 2dc, 3tr* , repeat ** until the end of the row, ch1, turn
Repeat rows 4 – 7 until you have the required length.
Final Row: change colors to orange, sc blo in the very first stitch, 2sc blo, *2hdc blo, 2dc blo, 3tr blo, 2dc blo, 2hdc blo, 3sc blo*, repeat ** until the end of the row, fasten off and weave in the ends.
To hide the color changes, crochet a single crochet row around your piece. If you don’t want to do that, then cut the yarn at every color change and later on weave in the ends.


