Arcade Waffle Crochet Blanket Pattern Photo Tutorial

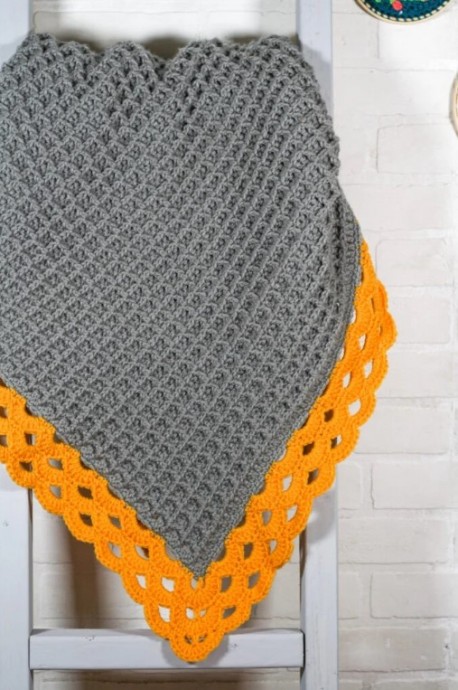
The Arcade Waffle Crochet Blanket is a combination of two beautiful stitches. The raised texture of the waffle stitch is balanced by the stunning look of an arcade stitch border.
A while ago I figured out how to turn the arcade stitch into a blanket border. I just loved how it looked, but sadly it required a complex stitch count and would not work on many blankets. You need a stitch count of 6+3 on each side for the blanket for the border to work.
So instead I decided to create a blanket just for this border. I just love the heavy texture of the waffle stitch and using this stitch I was easily able to come up with the right stitch count for this border. Even better, I was able to size the baby blanket into 7 different blanket sizes to meet your needs.
This stitch combination makes a beautiful crochet baby blanket, but I think it would look amazing as a comforter on a twin, full, queen or even king sized bed.
Learn how to crochet the Arcade Waffle Blanket with this photo tutorial.
Materials
- 19.5 oz or 1014 yds Red Heart Super Saver Yarn, Dusty Grey
- 5.7 oz or 297 yds Red Heart Super Saver Yarn, Gold
- Size J 6mm Crochet Hook
- Yarn Needle
- Scissors
Abbreviations
- CH – Chain
- SC – Single Crochet
- DC – Double Crochet
- FPDC – Front Post Double Crochet
- ST(s) – Stitch(es)
- SLST – Slip Stitch
Gauge and Size
Gauge: Working the Waffle Stitch 6 DC X 5 Rows = 2 inches
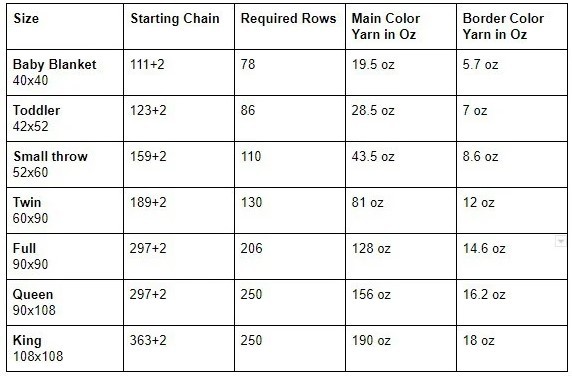
Size: The pattern provided is for the 40″ X 40″ Baby blanket size. The blanket measures roughly 38″ X 38″ before the stitches are allowed to relax and stretch. Below you will find a chart for all the other sizes including the starting chain count and the number of rows you will need to work to achieve that size.
These stitch and row counts are very important. If you work more or less rows, your border may not work on your blanket.
If the blanket size you are making says to chain 123+2, you will chain 125 chains and have a total of 123 stitches in every row. The +2 stands for the turning chain which is not counted as a stitch.
Notes
- I do not count my CH2, turning chain, as a stitch.
- The pattern is written for the Baby Blanket size with notes for adjusting the size.
Instructions
Crochet Blanket Base
CH 113 (or the number of chains listed below for the size you are making)
Row 1: DC in the 3rd CH from the hook. DC in every CH across. (111)
Row 2: CH2, turn, DC in the first St, FPDC in the next St, DC in the next St, * Work a FPDC in the next 2 Sts, DC in the next St*, Repeat from *to* until the end of the row.
Row 3: CH2, turn, Work a DC in the first 3 STs, *FPDC in the next St, Work a DC in the next 2 Sts*, Repeat from *to* until the end of the row.
Continue alternating rows 2 and 3 until you have reached the number of rows you are expected to work for your size. For the Baby blanket you will need to work 78 rows. Do not fasten off.
Adjusting the Crochet Blanket Size
- Baby Blanket – Start with a Chain of 113. Each row will have 111 stitches in it. You will work a total of 78 rows for the base of the blanket.
- Toddler Blanket – Start with a Chain of 125. Each row will have 123 stitches in it. You will work a total of 86 rows for the base of the blanket.
- Small Throw – Start with a Chain of 161. Each row will have 159 stitches in it. You will work a total of 110 rows for the base of the blanket.
- Twin Size Blanket – Start with a Chain of 191. Each row will have 189 stitches in it. You will work a total of 130 rows for the base of the blanket.
- Full-Size Blanket – Start with a Chain of 299. Each row will have 297 stitches in it. You will work a total of 206 rows for the base of the blanket.
- Queen Size Blanket – Start with a Chain of 299. Each row will have 297 stitches in it. You will work a total of 250 rows for the base of the blanket.
- King Size Blanket – Start with a Chain of 365. Each row will have 363 stitches in it. You will work a total of 250 rows for the base of the blanket.
Preparing for our Border
Before we work the arcade stitch border, we need to make a foundation row of single crochet stitches. To do this follow the row below.
Foundation Border Row: CH1, turn, SC in each ST across. (111 SC on this side of blanket)
Foundation Border Row Cont’d: When you reach the last ST, CH2 and begin working into the side of your rows. *Work 1 SC into the side of next ST, Work 2 SC into the side of next ST* repeat until you reach you have worked into the side of every row. (117 SC on this side of the blanket)
Foundation Border Row Cont’d: CH2, turn so you are working into the opposite side of the starting CH. Work a SC into the opposite side of each CH. (111 SC on this side of the blanket)
Foundation Border Row Cont’d: When you reach the last ST, CH2 and begin working into the side of your rows again. *Work 1 SC into the side of next ST, Work 2 SC into the side of next ST* repeat until you reach you have worked into the side of every row. (117 SC on this side of the blanket)
Foundation Border Row Cont’d: CH2, SLST to the first SC. Fasten off and weave in your ends.
Arcade Crochet Blanket Border
Now we will create our stunning arcade stitch blanket border using our border yarn color. I made 3 rows of shells, but you can continue repeating rows 5 and 6 to make the border as large as you like.
The border rows below use both *to* repeats and **to** repeats. Just read the rows slowly. Break the rows into parts and work through them slowly.
Border Row 1: SLST to any CH2 corner, CH2, DC into the CH2 corner. CH2, working along one side, SC into next 3 STs. *CH3, Skip next 3 STs, SC into next 3 STs* repeat *to* until you reach the next CH2 corner, **(CH2, DC, CH2) into the CH2 corner. SC into next 3 STs, *CH3, Skip next 3 STs, SC into next 3 STs* repeat *to* until you reach the next CH2 corner. ** repeat from **to** a total of 3 times. CH2, SLST to first DC of Row.
Border Row 2: CH2, Work 2DC into first ST, Work 5 DC into CH2 Space, *Skip ST, SC in next ST. Skip ST, Work 7 DC into CH3 space.* repeat from *to* until you reach the first CH2 corner Space. **Work 5 DC into CH2 Space, Work 3DC into next ST, Work 5 DC into CH2 Space. *Skip ST, SC in next ST. Skip ST, Work 7 DC into CH3 space.* repeat from *to* until you reach the first CH2 corner Space.** repeat from **to** a total of 3 times. Work 5 DC into CH2 Space, Work 1 DC into the same ST as the first 2DC. SLST to first DC.
Border Row 3: CH2, DC into 1st ST. CH2, Skip 1 ST, SC into next 3 STs, *CH3, Skip next 5 STs, SC into next 3 STs* repeat *to* until you reach the next corner (your last repeat will be worked onto the corner shell), **CH2, Skip 1 ST, DC into next ST, CH2 Skip 1 ST. SC into next 3 STs, *CH3, Skip next 5 STs, SC into next 3 STs* repeat *to* until you reach the next corner. ** repeat from **to** a total of 3 times. CH2, SLST to first DC of Row.
Note: Your corner DC should always be worked into the corner DC of the previous row.
Border Row 4: CH2, Work 2DC into first ST, Work 5 DC into CH2 Space, *Skip ST, SC in next ST. Skip ST, Work 7 DC into CH3 space.* repeat from *to* until you reach the first CH2 corner Space. **Work 5 DC into CH2 Space, Work 3DC into next ST, Work 5 DC into CH2 Space. *Skip ST, SC in next ST. Skip ST, Work 7 DC into CH3 space.* repeat from *to* until you reach the first CH2 corner Space.** repeat from **to** a total of 3 times. Work 5 DC into CH2 Space, Work 1 DC into the same ST as the first 2DC. SLST to first DC.
Border Row 5: CH2, DC into 1st ST. CH2, Skip 1 ST, SC into next 3 STs, *CH3, Skip next 5 STs, SC into next 3 STs* repeat *to* until you reach the next corner (your last repeat will be worked onto the corner shell), **CH2, Skip 1 ST, DC into next ST, CH2 Skip 1 ST. SC into next 3 STs, *CH3, Skip next 5 STs, SC into next 3 STs* repeat *to* until you reach the next corner. ** repeat from **to** a total of 3 times. CH2, SLST to first DC of Row.
Border Row 6: CH2, Work 2DC into first ST, Work 5 DC into CH2 Space, *Skip ST, SC in next ST. Skip ST, Work 7 DC into CH3 space.* repeat from *to* until you reach the first CH2 corner Space. **Work 5 DC into CH2 Space, Work 3DC into next ST, Work 5 DC into CH2 Space. *Skip ST, SC in next ST. Skip ST, Work 7 DC into CH3 space.* repeat from *to* until you reach the first CH2 corner Space.** repeat from **to** a total of 3 times. Work 5 DC into CH2 Space, Work 1 DC into the same ST as the first 2DC. SLST to first DC.
Fasten off and weave in your ends. Your blanket is complete and ready to be snuggled.


