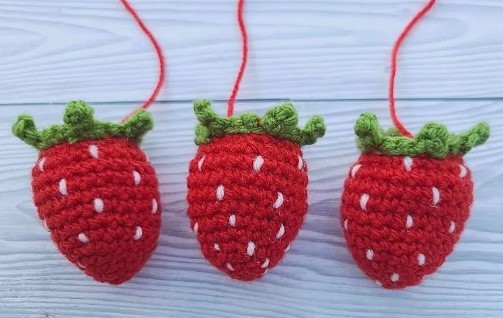
No Sew Crochet Strawberry Pattern

This No Sew Crochet Strawberry is a versatile adorable project that works up fast—you can make a bunch of these strawberries in one sitting. And the best part? This pattern doesn’t require sewing apart from the seeds.
It’s made with basic stitches, so it’s a beginner-friendly project. Once you start making these amigurumi strawberries, it’s easy to get hooked!
Grab a hook and let's learn how to crochet No Sew Strawberies.
Pattern Notes
Project Size
- Small (DK yarn): 6cm tall
- Medium (Aran yarn): 8cm tall
Yarn Used
- Acrylic DK yarn in red, pink & green
Supplies
- 4mm & 3.5mm crochet hooks
- tapestry needle
- scissors
Abbreviations
- magic ring
- slip knot
- ch(s) – chain(s)
- st(s) – stitch(es)
- sl st – slip stitch
- sc – single crochet
- dec – decrease (sc2tog)
- inc – increase (2sc in the same stitch)
- blo – crochet in the back loop only
No Sew Strawberry Pattern
- Work in the round, without turning or closing the rounds.
- Use a stitch marker or a piece of yarn to mark the beginning of each round.
- The number at the end of each round is the stitch count.
- The stitches written between ** are to be repeated as many times as indicated in the pattern.
The Berry
With red yarn and a 4mm crochet hook, make a magic ring.
Round 1: 6sc inside the magic ring, pull the tail to close the magic ring = 6
Round 2: *inc, sc* x 3 = 9
Round 3: *inc, sc in next 2sts* x 3 = 12
Round 4: *inc, sc in next 3sts* x 3 = 15
Round 5: *inc, sc in next 4sts* x 3 = 18
Round 6: sc in each stitch = 18
Round 7: *inc, sc in next 5sts* x 3 = 21
Round 8: sc in each stitch = 21
Round 9: *inc, sc in next 6sts* x 3 = 24
Rounds 10 – 12 (3): sc in each stitch = 24
Round 13: *dec, sc in next 2sts* x 6 = 18
Round 14: All stitches are crocheted in the back loop only. *dec, sc* x 6 = 12
Fasten off and leave a long tail. Stuff the strawberry with toy stuffing, and use the tail & crochet hook to close the hole.
You can leave the long tail if you want to sew the strawberry to another project or hang it, or weave it in.
The Leaves
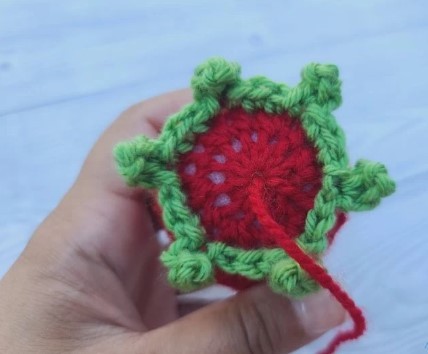
With a 3.5mm crochet hook, join the green yarn with a slip knot in any of the exposed front loops.
Round 1: *ch3, sc in 2nd ch from hook, sc in next chain, sl st in the same front loop, sc in next 2 front loops, sl st in next front loop* x 6 = 6 leaves
Fasten off, and weave in all green ends.
The Seeds
To sew the seeds, you need quite a long piece of pink yarn and the sewing needle.
Step 1: Insert the needle in the top of the strawberry and out 2 rows below the green strawberry leaves in any stitch.
Step 2: Insert the needle at the top of the stitch and out 4 stitches away at the bottom of the same row. Don’t pull the yarn too tight, otherwise, you will stretch the stitches and expose the stuffing.
Repeat Step 2 all around until you meet the first seed you made.
Step 3: When you do, insert the needle at the top of the stitch to create the last seed in that round and out 2 rows below the seed row, below a stitch that is right in between 2 seeds above. We will offset the seeds to make them look random and more natural.
Now repeat Steps 2 & 3 to make offset seeds until you reach the tip of the strawberry. As you go down the rounds, you will need to skip fewer stitches than the 4 advised on Step 2. Weave in all the ends.
(Optional) Strawberry Base With Leaves
If you want the entire strawberry base covered with leaves, use this pattern. Use the same hook you used for the strawberry.
With green yarn and a 4mm crochet hook, make a magic ring.
Round 1: 6sc inside the magic ring, pull the tail to close the magic ring = 6
Round 2: inc x 6 = 12
Round 3: *inc, sc* x 6 = 18
Round 4: *ch3, sc in 2nd ch from hook, sc in next chain, sl st in the same front loop, sc in next 2 front loops, sl st in next front loop* x 6 = 6 leaves
Fasten off, and weave in all green ends.


